Hardware & Usage
The most important first
 39C3 2025
39C3 2025
All data for the PCB, i.e. schematic and layout can be found here: Hardware Repo (KiCad 9): https://github.com/HazeCore/Nametag_Hardware
The application of the name
 CCCamp 2023
CCCamp 2023
The nametag has a light area on which you can write your desired name. Of course you can use a foil plotter, but probably almost everyone will read this page during camp: a black sharpie works fine, but I would recommend to write down the name, let it dry, and repeat it 2 times. The difference is clearly visible in the picture below.

In addition, I noticed a transparent film on the backlight during assembly. If you pull it off, the backlight is “matte”. So if this transparent foil should not be nice anymore, or have a bubble: Without reflects less anyway 😉.
In both cases, names can be removed with a piece of cloth or kitchen roll together with some isopropanol. (Tested with Permament “Sharpie”)
How to light it up? (Kinda a manual)
CCCamp 2023
CCCamp 2023
The name tag is powered by two CR2032 coin cells. Usually I will give the name badges with one set of button cells to you. Please note that these are not of the highest quality, and if you use the badge a lot at high brightness levels, the batteries will run out really fast. More about this on the Flaws page.
Once you’ve inserted the button cells, it either lights up immediately, or you have to slide the switch (labeled “Power”) again. This Switch disconnects the batteries from the rest of the circuit so that they don’t run down when the name tag is not in use.
When the name tag is on, you can press the button labeled “Mode” to cycle through the available animations. Holding down the button on the back will decrease the brightness. When the brightness reaches the minimum, it increases the brightness again. (Ping Pong)
There are to modes with constant colors (Only the Backlight and all LEDs). The used Color is saved in the Nametag and can be Changes as follows:
- Hold down the Mode Button
- Turn on the Power Switch, the Backlight will sweep through the Colors of the Rainbow
- Let go of the Mode Button at the desired Color
- The Color is now Saved and will be used for the “Constant-Color”-Modes
The Hardware detailed
CCCamp 2023
CCCamp 2023
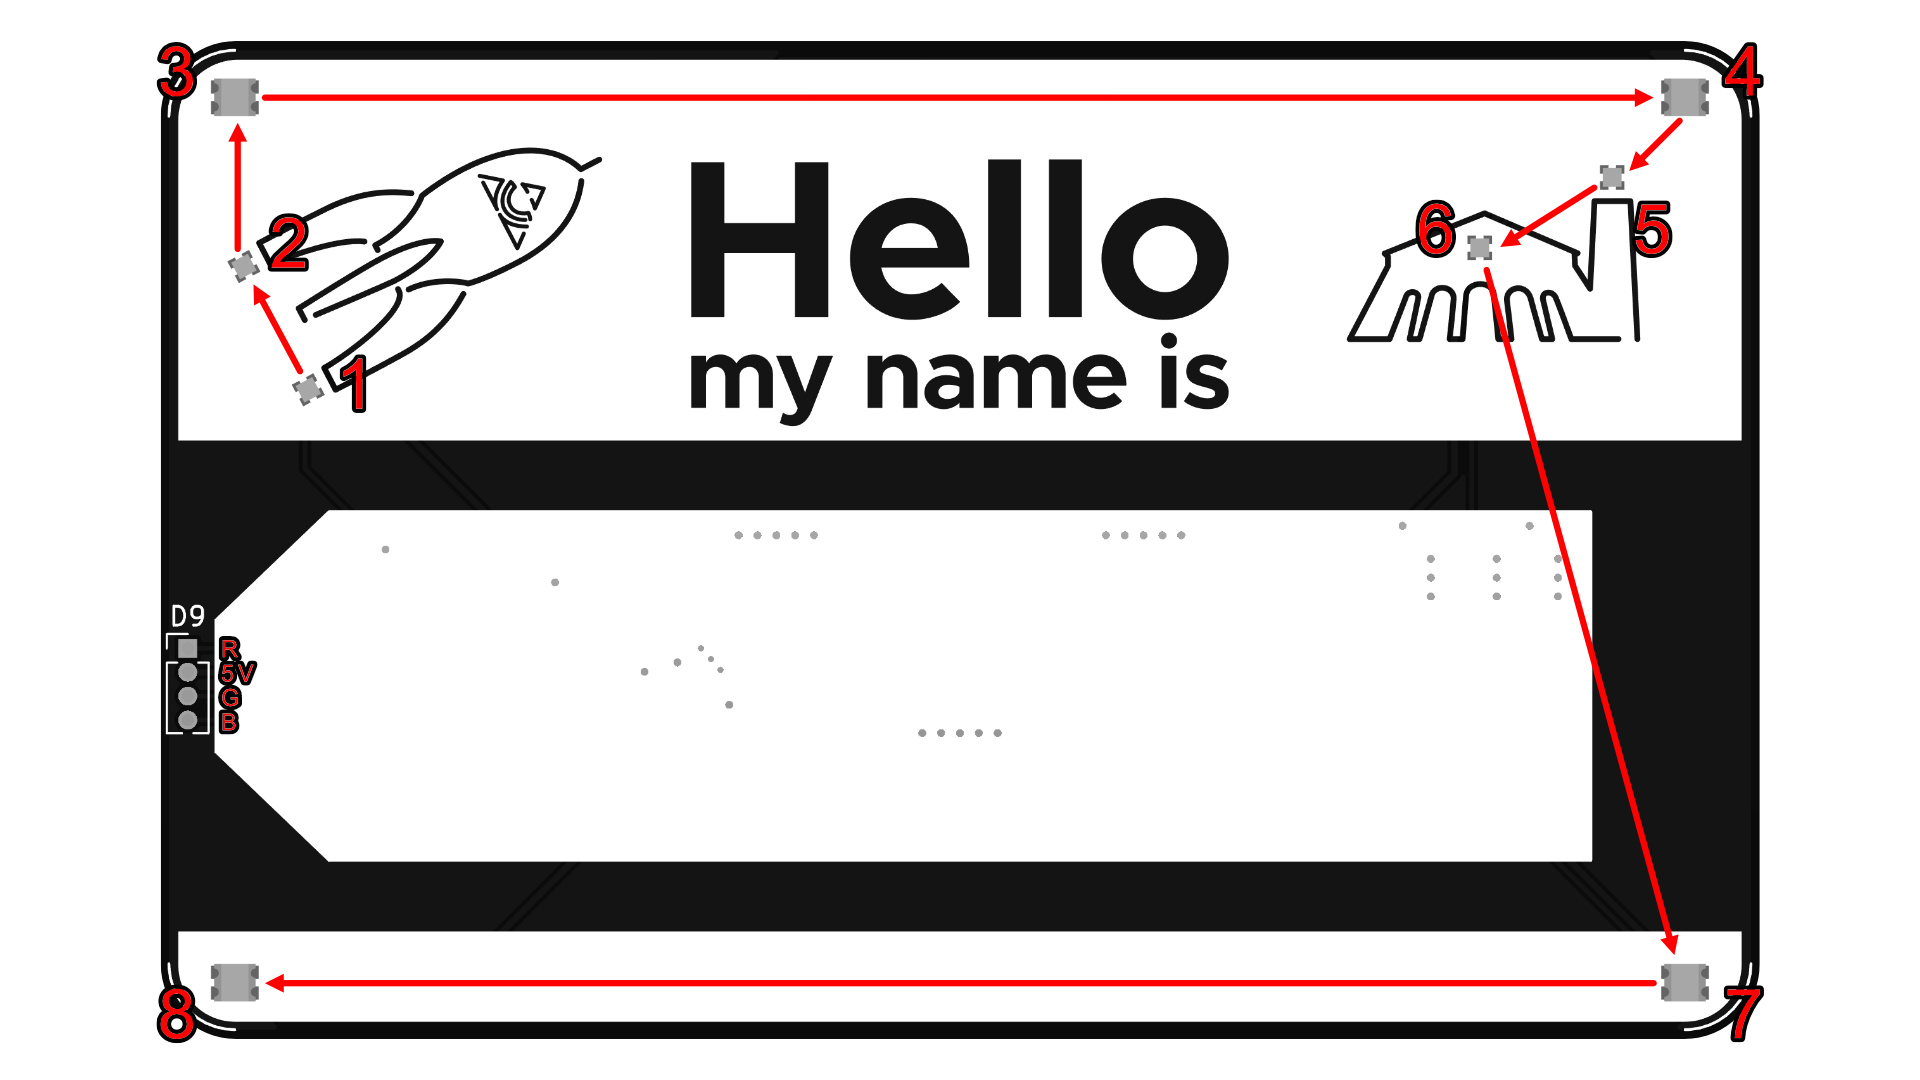
LEDs
Around the illuminated surface are a total of 8 controllable LEDs that use the same protocol as the well-known “WS2812B” LED strips. Each of them can be controlled individually, so that great blinking effects are possible. The following picture shows the order of the addressable LEDs. The LEDs are numbered in the sequence 1-8. Also visible in the picture is the pin assignment of the backlight. (Click on the picture to enlarge it)
Microcontroller
The whole thing is operated and controlled by an ATTiny402-SSNR. This is an 8-bit microcontroller with 4kB flash and 256 bytes of RAM. It is housed in an 8-pin case. It is programmed via a 1-pin interface, which expects UPDI as protocol. For programming and software, see the subpage “Software”.
Power supply
As mentioned above, the nameplate is powered by 2 CR2032 button cells. Each of these button cells has a nominal voltage of 3V. Since blue LEDs need a higher voltage (or at least that’s what I thought), the two button cells are in series. Since microcontrollers are only allowed to be operated with up to 5V, a linear voltage regulator is built in, which turns everything above 6V into 5V. If the voltage of the batteries falls below 5V, the regulator has no effect.
The system functions stable up to approx. 2.6 volts. Below that, it starts to flicker and the LEDs are no longer controlled properly, the “blue” is the first to go. Depending on the button cell, it is possible that if you leave the sign off for one or two hours, the batteries will regenerate enough for it to work again for an hour. But this is not guaranteed. More about this on the page with the flaws.